camera identify
Try for Free
tab list
PictureThis
PictureThis
Search
Search Plants
Try for Free
This page looks better in the app

How to Conduct DIY Soil Testing: Uncover What Your Garden Truly Needs

This step-by-step guide simplifies soil testing at home, helping you determine soil pH and nutrient levels for a thriving garden.
Rectangle Frame
Line
Unearth your garden’s secret needs! Grasp the art of DIY soil testing and cultivate a garden that thrives. Understanding soil pH and nutrient composition can offer valuable insights about your garden's health.
Rectangle
Why Soil Testing Matters
Understanding the concept of soil health and its importance in the gardening process is crucial for any DIY gardener. Soil health refers to the overall condition of the soil and its ability to support plant growth. It encompasses various factors such as nutrient content, pH levels, organic matter, and soil structure. When it comes to gardening, the health of the soil directly impacts the growth and health of the plants you cultivate.
A plant's growth and health are drastically influenced by the condition of the soil it is planted in. If the soil lacks essential nutrients or has an unfavorable pH level, it can stunt the plant's growth, weaken its immune system, and make it susceptible to diseases and pests. On the other hand, healthy soil that is rich in nutrients and has optimal pH levels promotes vigorous plant growth, improves fruiting and flowering, and increases overall resistance to environmental stressors.
Therefore, it is crucial to conduct soil testing before planting to provide an accurate roadmap for soil amendment. Soil testing helps you assess the current state of your soil and identify any deficiencies or imbalances. Armed with this knowledge, you can make informed decisions about soil amendments, fertilizer applications, and other necessary actions to optimize the soil conditions for your plants.
There are various methods to perform DIY soil testing that can provide practical value to any gardener. One such method is the use of soil testing kits, which are readily available in gardening stores or online. These kits typically include test strips or vials that you can use to measure the pH level, nutrient content, and organic matter in your soil. They often come with easy-to-follow instructions and color-coded charts to help you interpret the results.
Another DIY-friendly method is conducting a visual and tactile assessment of the soil. This involves carefully observing and feeling the texture of the soil to determine its composition and structure. Sandy soil feels gritty, clay soil feels sticky, while loam soil has a crumbly texture. Additionally, you can visually assess the color of the soil, which can indicate its fertility and drainage capabilities. Dark, rich soil is often associated with high organic matter content and excellent drainage.
In addition to soil testing methods, it is also important to regularly monitor and maintain the health of your soil. This can include practices like crop rotation, cover cropping, and adding organic matter in the form of compost or mulch. By nurturing and improving the health of your soil, you can create an optimal environment for your plants to thrive.
In summary, soil testing is a vital step in the gardening process, providing valuable insights into the condition of your soil and guiding your soil management practices. By understanding the concept of soil health and utilizing DIY-friendly testing methods, you can ensure that your garden receives the nutrients and conditions it needs to flourish.
Rectangle
Understanding Soil pH and Nutrient Levels
Understanding the pH balance and nutrient levels of your soil is essential for a healthy and thriving garden. pH, which stands for potential of hydrogen, is a measure of how acidic or alkaline your soil is. It is measured on a scale of 0 to 14, with 7 being neutral. A pH below 7 indicates acidic soil, while a pH above 7 indicates alkaline soil. Most plants prefer a slightly acidic soil, with a pH range of 6 to 7, but some may have specific pH requirements.
Maintaining the correct pH balance is crucial for plant health because it affects the availability of nutrients in the soil. When the soil pH is too acidic or too alkaline, certain nutrients become less available to plants. For example, in acidic soil, essential macronutrients such as nitrogen, phosphorus, and potassium may be locked up and inaccessible to plants. On the other hand, alkaline soil can result in micronutrient deficiencies, such as iron or zinc, as they become less soluble and harder for plants to uptake.
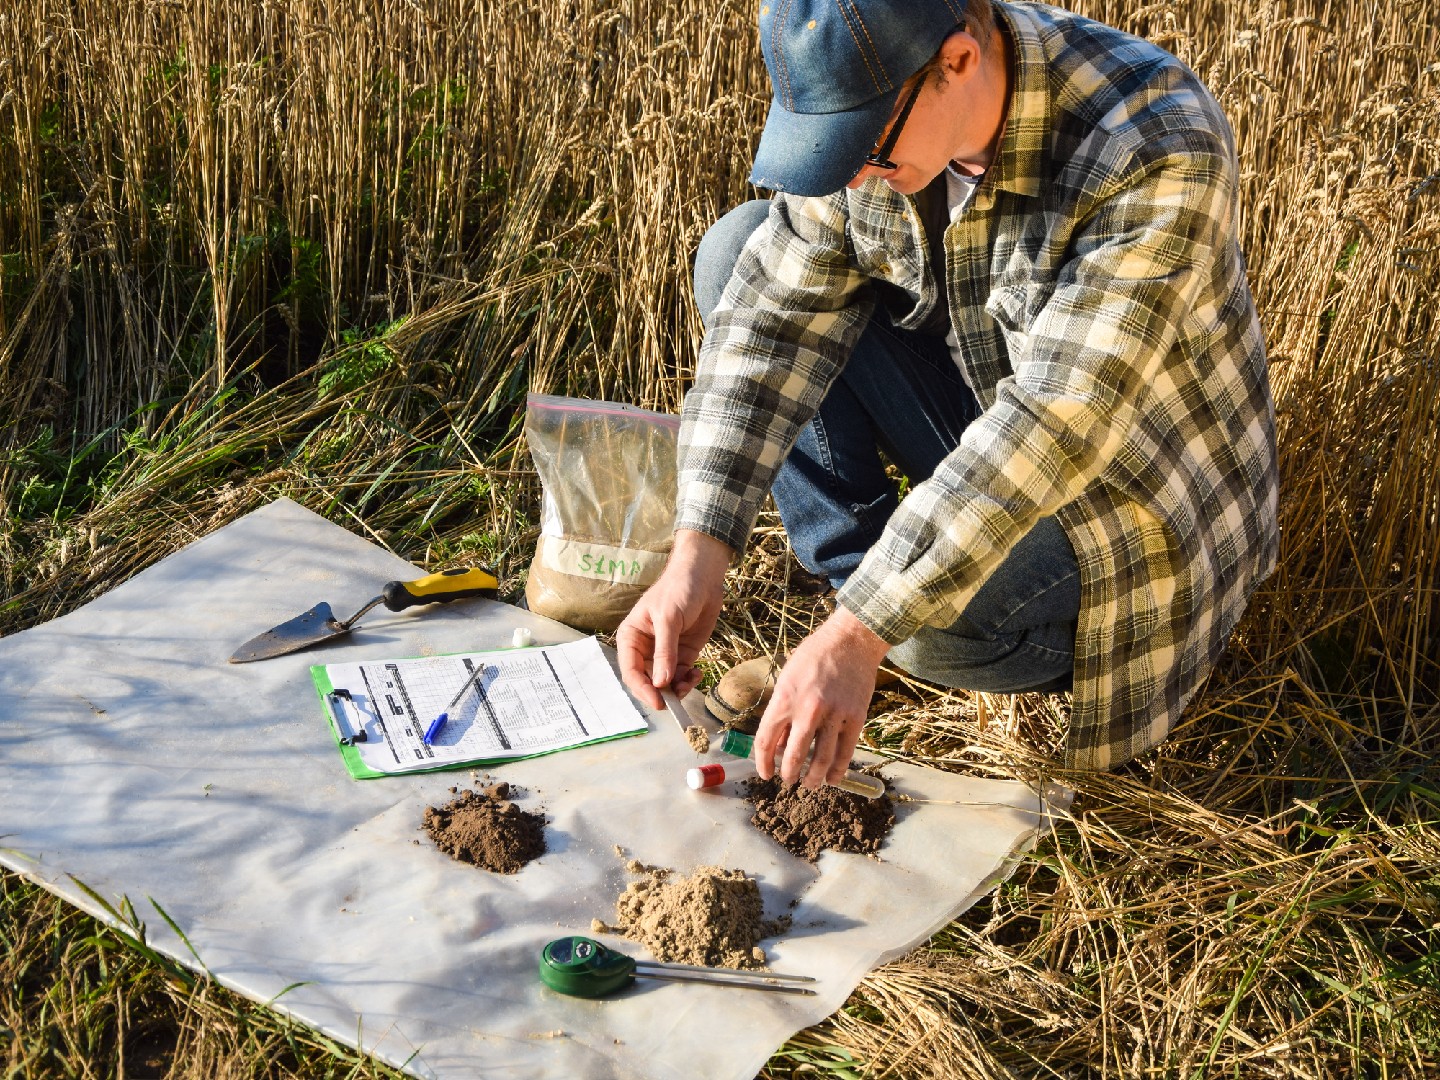
To determine the pH of your soil, you can perform a simple DIY soil test using a pH test kit or a digital pH meter. Collect soil samples from different areas of your garden and mix them together in a clean container. Next, follow the instructions provided with the pH test kit or digital pH meter to obtain accurate readings. If your soil's pH falls outside the desired range, you can make adjustments by adding soil amendments. For example, if your soil is too alkaline, you can lower the pH by adding organic matter like compost or peat moss. If it's too acidic, you can raise the pH by adding lime or wood ash.
In addition to pH, understanding the nutrient levels in your soil is essential for plant growth. Plants require macronutrients, which are needed in large quantities, and micronutrients, which are needed in smaller amounts. The primary macronutrients include nitrogen (N), phosphorus (P), and potassium (K). These nutrients play a crucial role in plant growth, with nitrogen promoting leaf and stem development, phosphorus aiding in root growth and flower formation, and potassium contributing to overall plant health and disease resistance.
Micronutrients, on the other hand, are essential for plant vitality, despite being required in smaller quantities. These include iron (Fe), zinc (Zn), manganese (Mn), copper (Cu), boron (B), molybdenum (Mo), and chlorine (Cl). Micronutrients help with various plant functions, such as photosynthesis, enzyme activation, and nutrient uptake.
To assess the nutrient levels in your soil, you can get a professional soil test done or use a DIY soil test kit that measures the major nutrient levels. By understanding both macronutrient and micronutrient levels in your soil, you can provide targeted fertilization or soil amendments to ensure optimal plant health and growth.
In conclusion, understanding soil pH and nutrient levels is crucial for a successful garden. By maintaining the correct pH balance and ensuring the availability of essential nutrients, you can create an environment that promotes healthy plant growth and vitality. Performing regular soil tests and making necessary adjustments will help you uncover what your garden truly needs, ultimately leading to a bountiful and flourishing garden.
Rectangle
Step-by-Step Guide to DIY Soil Testing
Soil testing is an essential step for every gardener who wants to ensure the health and vitality of their plants. While professional soil testing services are available, conducting a DIY soil test can be a cost-effective and informative alternative. In this step-by-step guide, we will walk you through the process of conducting a basic soil test at home using a DIY soil kit, ensuring that you uncover what your garden truly needs.
Step 1: Gathering the necessary materials To get started, you will need a DIY soil testing kit, which you can find at your local garden center or online. These kits typically include testing tubes, color-coded indicators, and solutions for measuring pH, nitrogen, phosphorus, and potassium levels in the soil.
Step 2: Collecting soil samples Once you have your soil testing kit ready, it's time to collect soil samples from different areas of your garden. It's important to sample different garden areas separately, as the soil composition can vary.
To collect a soil sample, follow these steps:
  1. Choose a representative area in each garden section and remove any debris from the surface.
  2. Dig a small hole around 6 to 8 inches deep and collect a sample of soil from the hole.
  3. Repeat this process in several areas of each garden section, ensuring that you collect at least 6 to 8 samples in total.
  4. Combine the soil samples in a clean container and mix them thoroughly.
Step 3: Conducting the soil test Once you have your soil sample, it's time to conduct the test. Follow the instructions provided with your DIY soil testing kit, as different kits may have slightly different procedures.
Typically, the process involves adding a small amount of the soil sample to the testing tube and then adding the appropriate solution. The solution will react with the soil and change color, indicating the nutrient levels or pH.
Step 4: Interpreting the results After conducting the soil test, you will have a set of results in front of you. These results will provide valuable insights into the nutrient content and pH level of your soil. Each DIY soil testing kit comes with a guide to help you interpret the results.
Based on the results, you can determine what your garden needs and make informed decisions about fertilizing or amending the soil. For example, if the pH level is too high or too low, you can adjust it by adding lime or sulfur to bring it to the appropriate range for your plants.
Soil testing is a vital practice that enables gardeners to optimize their plant growth. By conducting DIY soil tests using a soil testing kit, you can uncover what your garden truly needs and provide the necessary care for your plants. Remember to repeat the soil test annually or whenever you notice significant changes in your garden, as soil conditions can vary over time.
Rectangle
After the Test: Understanding Soil Amendments
Once you have received your soil test results, it's time to take action and improve the health of your garden soil. Understanding the different soil amendments and how to use them effectively can help you achieve optimal growing conditions for your plants.
Soil amendments are materials that are added to the soil to improve its physical properties, nutrient content, or pH level. The specific amendments you will need to use depend on the test results and the requirements of the plants you want to grow. Here are some common amendments and how to use them:
  1. Organic Matter: Adding organic matter, such as compost, manure, or shredded leaves, can greatly improve the structure and fertility of the soil. Organic matter improves water retention, enhances drainage, and provides essential nutrients for plant growth. Spread a layer of organic matter over the soil and mix it in thoroughly before planting.
  2. Lime: If your soil pH is too acidic, adding lime can help raise it to a more neutral level. Lime is commonly used to reduce soil acidity and provide a better growing environment for a wide range of plants. Follow the recommendations on your soil test report for the correct amount of lime to apply.
  3. Nitrogen: If your soil test indicates a deficiency of nitrogen, you can add nitrogen-rich amendments like blood meal, bone meal, or fish emulsion. Nitrogen is essential for plant growth and is often lacking in garden soils. Be careful not to overapply nitrogen as it can lead to excessive vegetative growth and reduce fruiting or flowering.
Regular monitoring of your soil is essential for long-term soil health maintenance. Even after amending your soil based on the initial test results, it's important to keep an eye on its nutrient levels and pH over time. Conducting regular soil tests every 2-3 years can help you make informed decisions about future amendments and ensure that your soil remains balanced and fertile.
In addition to soil amendments, other factors like crop rotation, cover cropping, and companion planting can also contribute to overall soil health. These practices help improve soil structure, increase organic matter content, and control pests and diseases. By incorporating a variety of methods and practices, you can create a thriving garden that is sustainable and productive.
By understanding soil amendments and implementing them based on your soil test results, you can uncover what your garden truly needs and create the ideal growing conditions for your plants. So take the time to test your soil, make the necessary amendments, and enjoy a successful and bountiful garden.
Concluding Thoughts
DIY soil testing isn't just a science, it's a key to unlocking your garden's potential.
Frame
Conclusion
Line
Cookie Management Tool
In addition to managing cookies through your browser or device, you can change your cookie settings below.
Necessary Cookies
Necessary cookies enable core functionality. The website cannot function properly without these cookies, and can only be disabled by changing your browser preferences.
Analytical Cookies
Analytical cookies help us to improve our application/website by collecting and reporting information on its usage.
Cookie Name Source Purpose Lifespan
_ga Google Analytics These cookies are set because of our use of Google Analytics. They are used to collect information about your use of our application/website. The cookies collect specific information, such as your IP address, data related to your device and other information about your use of the application/website. Please note that the data processing is essentially carried out by Google LLC and Google may use your data collected by the cookies for own purposes, e.g. profiling and will combine it with other data such as your Google Account. For more information about how Google processes your data and Google’s approach to privacy as well as implemented safeguards for your data, please see here. 1 Year
_pta PictureThis Analytics We use these cookies to collect information about how you use our site, monitor site performance, and improve our site performance, our services, and your experience. 1 Year
Cookie Name
_ga
Source
Google Analytics
Purpose
These cookies are set because of our use of Google Analytics. They are used to collect information about your use of our application/website. The cookies collect specific information, such as your IP address, data related to your device and other information about your use of the application/website. Please note that the data processing is essentially carried out by Google LLC and Google may use your data collected by the cookies for own purposes, e.g. profiling and will combine it with other data such as your Google Account. For more information about how Google processes your data and Google’s approach to privacy as well as implemented safeguards for your data, please see here.
Lifespan
1 Year

Cookie Name
_pta
Source
PictureThis Analytics
Purpose
We use these cookies to collect information about how you use our site, monitor site performance, and improve our site performance, our services, and your experience.
Lifespan
1 Year
Marketing Cookies
Marketing cookies are used by advertising companies to serve ads that are relevant to your interests.
Cookie Name Source Purpose Lifespan
_fbp Facebook Pixel A conversion pixel tracking that we use for retargeting campaigns. Learn more here. 1 Year
_adj Adjust This cookie provides mobile analytics and attribution services that enable us to measure and analyze the effectiveness of marketing campaigns, certain events and actions within the Application. Learn more here. 1 Year
Cookie Name
_fbp
Source
Facebook Pixel
Purpose
A conversion pixel tracking that we use for retargeting campaigns. Learn more here.
Lifespan
1 Year

Cookie Name
_adj
Source
Adjust
Purpose
This cookie provides mobile analytics and attribution services that enable us to measure and analyze the effectiveness of marketing campaigns, certain events and actions within the Application. Learn more here.
Lifespan
1 Year
This page looks better in the app
Open